
Your 4-H Horse: Care, Management, and Horsemanship
Things to Learn
The following are things you can learn by doing in the 4-H Horse project. Your leader or Extension agent should check each one.
- Know the common horse terms and names of the breeds of light horses.
- Know the common color characteristics.
- Know and be able to identify the parts.
- Know the common forms of faulty conformation of the feet and legs.
- Describe the parts of the hoof and tell how each part functions.
- Report on the characteristics, origin, and use of your favorite breed.
- Describe and point out the ideal horse conformation.
- Explain and demonstrate the three natural gaits of a horse.
- Explain the slow gait and rack.
- Describe the movement of faulty action.
- Know and describe the diseases and parasites of horses.
- Describe or show how to determine the age of a horse by its teeth.
- Know and identify the parts of your equipment.
- Demonstrate how to care for your equipment.
- Know at least 15 of the safety rules of good horsemanship.
- Describe and show the kinds of feed necessary for a horse.
- Describe how to feed the foal and yearling.
- Demonstrate the proper method of grooming your animal.
- Demonstrate how to test for unsoundness.
- Lead your horse at halter at the walk and trot.
- Properly approach, halter, bridle, and saddle your horse.
- Mount; ride at the walk, trot, and canter, using good seat and hands; back your mount; dismount.
- Demonstrate control of your horse at all speeds, using proper reining, seat, and hands.
- Gather, start, turn, and stop your horse when asked.
- Demonstrate a series of figure eights, changing leads at the canter.
- Start to canter from a standing position, trot, walk; take first the right lead and then the left for each.
- Trot with and without posting; when posting, use either diagonal upon request.
- Trot a figure eight, posting on the outside diagonal at all times.
- Canter in a circle, using proper lead; reverse.
- Back your horse mounted and unmounted; ground-tie your horse.
- Demonstrate proper performance in the show ring.
- You may add other equally challenging things of your own choice, as long as they are satisfactory to your leader or agent.
Horse and pony projects are popular with Mississippi 4-H’ers. This manual will help you select, care for, handle, ride, and show your horse. When used in this manual, the word “horse” also applies to ponies. In addition to horsemanship, the project includes care and management of your horse or horses. To do this, you must own one or more horses for pleasure riding. The project includes yearling filly, gelding, 2-year-old mare, or mare and foal.
What Kind of Horse
Classification and Breeds
Horses are classified according to their use. There are pleasure mounts or saddle horses; harness horses; racehorses, including running horses and trotters and pacers; stock horses; hunters and jumpers; polo ponies; draft or work horses; and many other subdivisions. The height of the animal, as measured from the top of the withers to the ground, determines whether it is classified as a horse or pony. A horse is 14 hands, 2 inches and over; a pony is under 14 hands, 2 inches. A hand is 4 inches.
The most popular light-horse breeds in the United States, according to approximate registration figures, are listed. Of course, many horses are not purebred and registered.
- American Quarter Horse
- Thoroughbred (racehorse)
- American Shetland Pony
- Standardbred (trotters and pacers)
- American Saddle Horse
- Tennessee Walking Horse
- Arabian
- Appaloosa
- Palomino
- Morgan
- Welsh Pony
- Hackney Pony
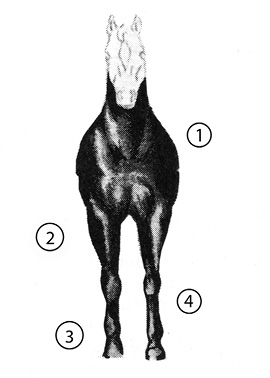
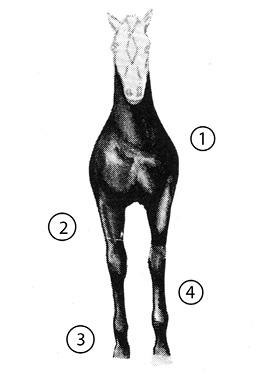
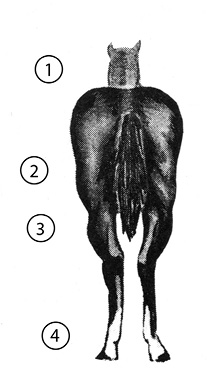
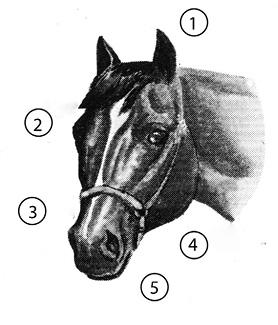
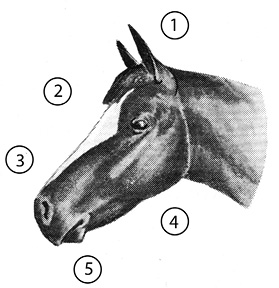
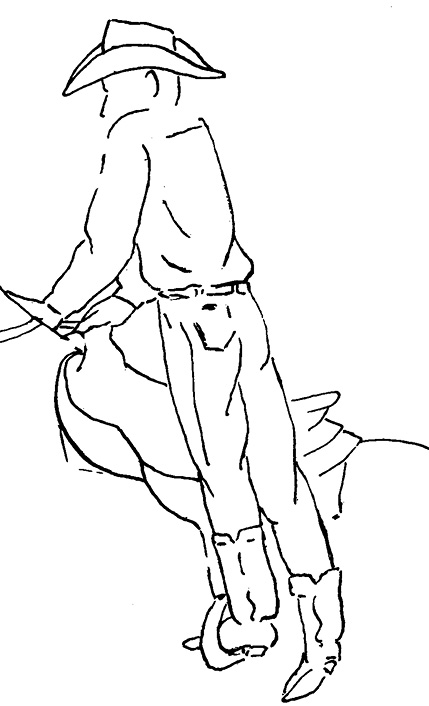
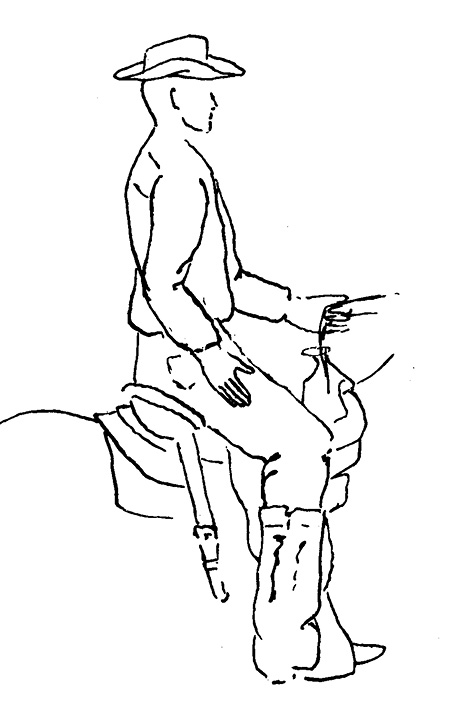
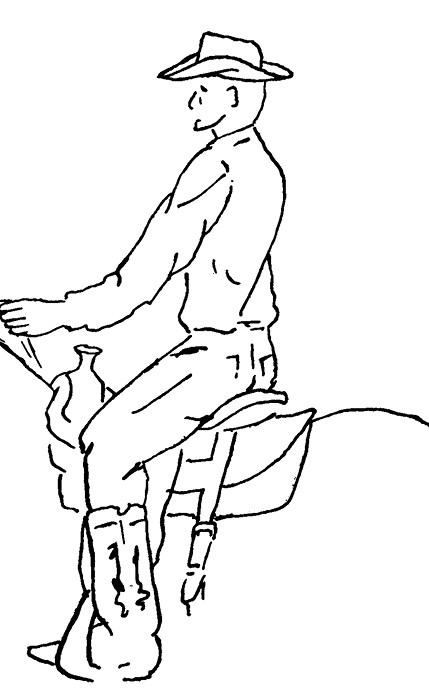
Learn Parts of a Horse
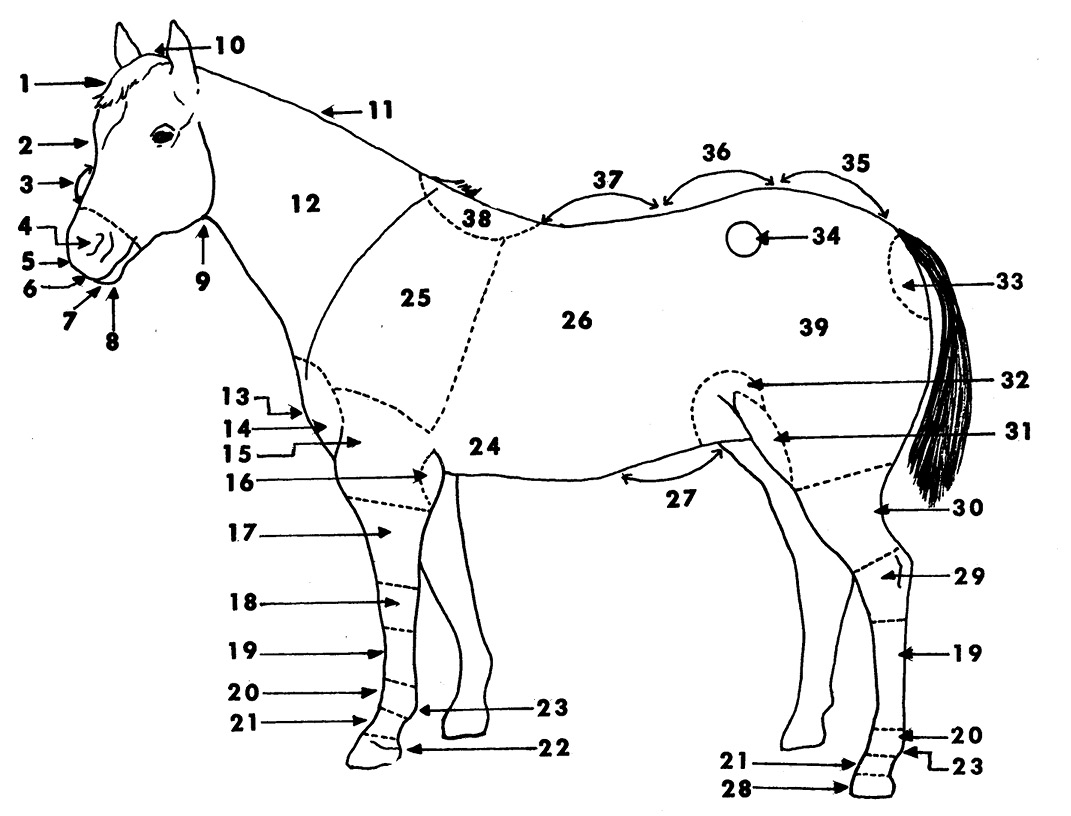
- Forehead
- Face
- Bridge of nose
- Nostril
- Muzzle
- Upper lip
- Lower lip
- Under lip
- Throat latch
- Poll
- Crest
- Neck
- Point of shoulder
- Chest
- Arm
- Elbow
- Forearm
- Knee
- Cannon
- Ankle
- Pastern
- Coronet
- Fetlock
- Girth
- Shoulder
- Barrel
- Abdomen
- Hoof
- Hock
- Gaskin
- Stifle
- Flank
- Buttock
- Point of hip
- Croup
- Loin
- Back
- Withers
- Thigh
Horse Terms
Foal: a young horse of either sex up to yearling
Filly: a young female under 5 years
Colt: a young male up to 5 years
Mare: a mature female at least 5 years old
Horse or stallion: a mature male
Gelding: an unsexed male
Yearling: a colt or filly that is at least 1 year but not yet 2 years old
Balance: depth and width from front to rear with all parts blending smoothly, giving a pleasing appearance to the eye
Bloom: usually refers to hair that is clean, glossy, and of a healthy, fine texture
Characteristics: identifying or distinguishing points or parts
Coarse: rough, harsh appearance
Conformation: body shape or form
Mellow hide: soft, pliable, and easy to handle
Palatable: agreeable, pleasing to the taste
Paunchy: applied to an animal that carries too much belly
Pudgy: dumpy, short, and thickset
Quality: fineness of texture; freedom from coarseness
Soundness: freedom from any abnormal deviation in structure or function that interferes with the horse’s usefulness
Stylish: having a pleasing, graceful, alert general appearance
Symmetrical: proper balance or relationship of all parts
Action: straight and true, clean-cut, free, and bold
Tack: equipment used in riding, such as saddle, bridle, blanket
Groom: cleaning and brushing
Common Colors
Bay: reddish brown with black mane and tail
Brown: dark drown; mane and tail usually the same color
Black: body, mane, and tail black
Chestnut: reddish color; mane and tail lighter than body; varies from dark liver color to washy yellow; never has black mane or tail
Sorrell: a rich, reddish chestnut
Palomino: light chestnut to creamy; occasionally a golden color; mane and tail are usually lighter than body
Buckskin: tan body with black mane and tail
Gray: mixture of black and white hairs; may be dappled
Roan: fairly even mixture of colored and white hairs; the red roan (sometimes called “strawberry roan”) has a mixture of red and white hairs; the blue roan has black and white hairs
Pinto or paint: white and colored spots over entire body; spots usually large
Dun: varies from a grayish brown to a golden dun; usually accompanied with black points and stripe
Color Markings

Other Markings
Black points: black mane, tail, and extremities
Ray: the line found along the back of some horses
Zebra marks: the dark, horizontal stripes seen on forearm, knees, and back of the cannon region
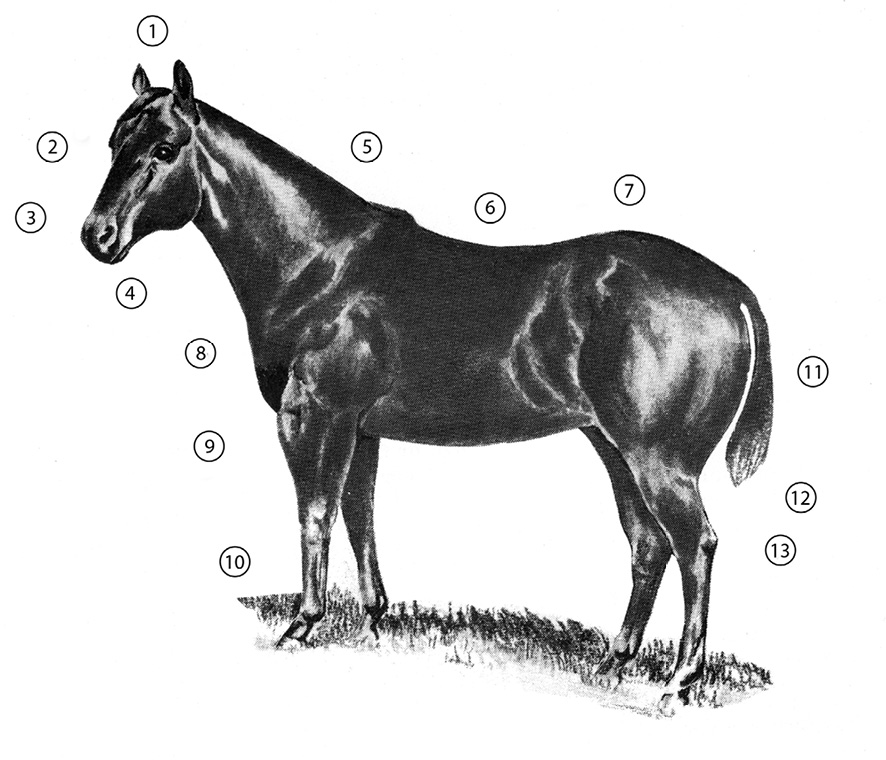
Selecting Your 4-H Horse
In selecting your horse, it is important to get an overall view of its general appearance. You can develop skill in estimating a horse’s value by looking first as its
- feet, legs, and action
- withers, back, loin, and croup (top line)
- muscling and body capacity
All horses are valued for their performance. For this reason, a horse’s feet, legs, and action, or “way of going,” are extremely important. The feet and legs should be sound and correctly placed, and the horse should move with a long, true, straight stride. Its action should be coordinated and prompt, with enough flexing of the knees and hocks to ensure an enjoyable ride.
A good weanling often appears “leggy.” But if it has a deep chest and ribs, it will probably develop balance as it matures. Beware of a colt that is too wide or too short-legged. It may be easy to care for but may not develop the action necessary for a good riding horse. A wide, short-legged horse tends to roll from side to side and pound the ground, causing a very rough ride.
Horses have good “tops” when they have clean withers, strong, short backs, and long, evenly turned croups. Muscling gives a horse its power to move, and it should have plenty of well-defined muscling in the quarter, stifle, gaskin, arm, forearm, and croup. A deep shoulder, heart girth, and barrel, along with well-sprung ribs and good width between the front legs, mean that the horse’s chest capacity is adequate for its heart and lungs and ensures good wind and stamina. Feeding capacity is indicated by a reasonably deep rear flank. Other characteristics, such as breed character in the head, ear, and neck, are also important.
It is more difficult to select a yearling or a 2-year-old than an older horse because the colt or filly is not yet fully developed. A careful study of the colt’s parents is helpful because many of the parents’ characteristics will be passed on to the offspring. A yearling should have a deep, well-balanced body on straight, well-set legs.
These are other basic points that you should consider in selecting your horse:
- The amount of experience you have had
- The facilities you have available
- The price you can afford to pay
- Your preference in breed
- Your plans for using the horse
It is best to have an experienced horseman help you select your first few animals. The ideal horse should have these qualities:
- Feet: smooth, level, deep
- Action: straight, free
- Disposition: gentle and controllable
Good Quarter Horse Type
- Fox ear
- Big eye
- Large nostril
- Strong jaw
- Moderately high withers
- Short back
- Strong kidney area
- Sloping shoulder
- Powerful forearm
- Short cannon
- Powerful driving muscle
- Muscular gaskin
- Low hock
Shoulders, Barrel, and Hips
Good
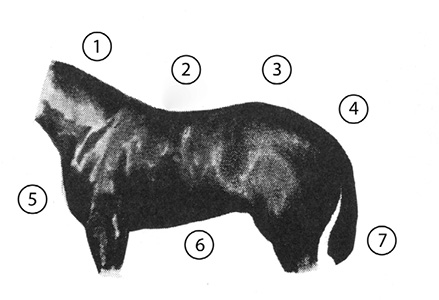
- Moderately high withers
- Short back
- Strong kidney area
- Long hip
- Sloping shoulder
- Deep girth
- Driving muscle tied high up
Undesirable
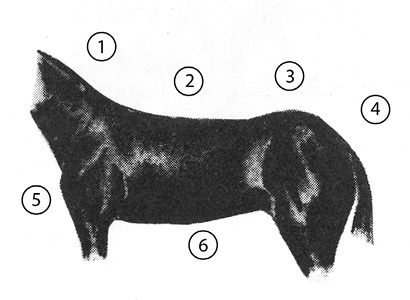
- Lack of withers
- Long back
- Slack at the kidneys
- Short hip
- Straight shoulder
- Weak barrel
Front Quarters
Good
- Wide chest with definite “vee” between legs
- Powerful forearm tapering to knee
- Strong pastern
- Short cannon
Undesirable
- Flat chest between legs
- Weak forearm
- Weak pastern
- Long cannon
Hind Quarters
Good

- Well rounded quarters
- Good width through stifle
- Gaskin muscled inside and out
- Low wide hock
- Short cannon
Undesirable
- Pear shaped quarters
- Lack of width through stifle
- No muscle inside gaskin
- Long cannon
Head
Good
- Short fox ears
- Large wide-set eyes
- Large nostrils
- Dinner plate jaw
- Short muzzle
Undesirable
- Long ears
- Small eye
- Long muzzle
- Weak jaw
- Over-shot lip
Unsoundness of the Horse
You should learn to recognize the common faults of horses in order to avoid animals with these faults. The horse with a long back and light, shallow flank is probably a poor “doer” and lacks endurance. Shallow, flat feet are also negatives because they are usually shelly and brittle.
Some of the common faults of horses are:
- Weak constitution (physical condition): indicated by a narrow chest; long, shallow body; light, shallow flank; long back
- Poor action: indicated by straight shoulders; straight, short pasterns; crooked legs and feet; short, stubby gait; winging; padding; and interfering
- Weak feet and legs: indicated by shallow, flat feet; light, weak cannons; crooked and weak hocks
- Bad temperament: balking, kicking, rearing, backing, shying
Every horse owner should be able to recognize the common unsoundnesses, defects, and blemishes. A suggested method of examination is:
- Observe the horse in a stall.
- Examine the horse at the halter.
- Observe the horse in motion.
- Observe the horse after exercise.
If you are suspicious or detect something you do not understand, call an expert and have the horse thoroughly examined.
- Poll evil
- Moon blinders
- Overshot or undershot
- Sweeney
- Over in the knee
- Bowed tendon
- Side bone
- Splint
- Shoe boil
- Hernia
- Stifled
- Bog spavin
- Bone spavin
- Toe crack
- Ring bone
- Quarter crack
- Curb
- Thoroughpin
- Hipped
- Fistula
Definitions of Unsoundness
Feet
Toe crack: a split in the front part of the hoof wall; may be partial, complete, or high or low
Quarter crack: a split in the quarter area of the hoof wall (toward the heels)
Seedy toe: a separation of the wall of the hoof near the toe
Pastern
Ring bone: a bony enlargement surrounding the bones of the pastern
Side bone: ossification of the lateral cartilages (a result of injury that causes calcium to accumulate and harden)
Cannon
Splint: a bony enlargement in the groove formed by the splint and cannon bones; may be high or low, forward or back
Bowed tendon: an extension backward of the flexor tendons from being torn or stretched
Hock
Capped hock: an enlargement on the point of the hock
Curb: an enlargement below the point of the hock
Thoroughpin: a soft, puffy enlargement in the web of the hock
Bog spavin: any inflammation or swelling of the soft tissues of the hock
Bone spavin: any bony enlargement on the bones of the hock
Hip
Knocked-down hip (hipped): a fracture of the point of the hip
Knee
Over in the knee: a bending forward of the knee caused by injured tendons, foot trouble, or hard work at too early an age
Elbow
Capped elbow: enlargement at the point of the elbow
Shoe boil: running sore at the elbow
Body
Hernia (rupture): a protrusion of a loop of tissue through an abnormal opening
Shoulder
Sweeny: shrinking of muscle on shoulder blade
Fistula and/or poll evil: swelling that begins soft and painless at first; keeps growing until it bursts, becomes infected, and pus forms; occasionally the bone becomes infected
Head
Overshot or undershot: teeth do not make contact
Moon blinders: white spot in eye and poor eyesight
Unsoundness Revealed by Performance
Heaves: a forced and labored breathing
Roaring: an abnormal sound produced when breathing
Stringhalt: a peculiar jerking up of the hind leg when walking or trotting
Caring for Your Horse
Feeding
The average mature horse ridden occasionally can be carried on grazing during the major part of the year. This, of course, depends on the amount and quality of grazing available.
Feed is the biggest single item of expense after you buy the horse. Feeds are classified as roughages (hay) and concentrates (grain).
Young horses need a greater amount of protein and minerals than mature animals. They do well on oats and good quality legume hay. Older horses can handle grains such as corn better than young animals. Horses being ridden every day need some grain; the harder they work, the more grain they require. They tend to eat too much, so feed only the amount recommended in the daily feed chart. Do not feed dusty or moldy feeds to horses.
Daily feed allowance (per 100 pounds of body weight).
|
Amount of work |
Roughage (lb) |
Grain (lb) |
|
Idle |
1½ or good pasture |
– |
|
Light work |
1½ |
1/3 |
|
Heavy work |
1¼ |
1 |
|
Idle nursing mare |
1½ |
1/3 |
|
Growing foal after weaning |
1¼ |
1 |
Concentrates. Oats are the most popular grain for horses since they are rich in protein and minerals and are safe to feed.
Corn may be used with older horses, but since it is low in protein, it should be fed with a protein-rich hay such as a legume hay. Do not feed moldy corn because it may cause digestive trouble.
Bran is rich in minerals and protein and is a valuable feed for horses. It is high in phosphorus and slightly laxative. Because of its bulkiness, it will make hungry horses take more time in chewing their feed.
Your horse should eat all of its grain within 30 minutes after it is fed.
Other feeds. Salt and good, clean water should be available at all times. It is better to feed loose salt than block salt.
Soybean meal and cottonseed meal are protein concentrates and may be used as a supplement for horses. They are usually cheaper than linseed meal but will not produce as sleek a hair coat.
Any change in feeds should be done gradually.
Feeding the Mare
The mare should run on good pasture whenever possible. Provide water, salt, and plenty of shade. In the fall and winter, when pasture does not furnish much feed, the mare will need about 1 pound of good quality hay daily for every 100 pounds of weight.
Toward the end of pregnancy, feed the mare one-half to 1 pound daily of grain (oats, bran, corn) per 100 pounds of body weight. If the mare is idle and nursing a foal, she may need, in addition to good pasture, about one-third pound of grain daily per 100 pounds of body weight to help keep up her milk production.
Feeding the Foal and Yearling
A foal will begin to eat a little grain from its mother’s feed box when it is a few weeks old. Foals nursing idle mares do not need grain until weaning time, especially on a good pasture. If you want to push the foal, give it a separate feed box and feed extra grain. A small amount of grain will aid in gentling and handling foals.
After Weaning (5–7 months)
Feed the foal 1 pound of grain for every 100 pounds of liveweight and all the good hay that it will eat. It will need less grain unless you are pushing the colt for early maturity or for shows. A foal gets 50–55 percent of its weight its first year. During this period, a foal can gain 1 pound of weight with about half as much feed as it requires the second year, so it is economical to feed well the first year. So far, as the yearling is concerned, it is better to let it graze if possible. This is cheaper and is better for its health. The ration for a yearling is about the same as for a foal, but slightly less protein is required.
Make sure that your horse gets plenty of exercise. It keeps the horse healthy and prevents it from getting lazy. If your horse is confined to the stable a good portion of the time, be sure that you give it plenty of regular exercise.
Shelter
The only shelter that most horses need is a place to get out of the wind, sun, or rain. Fancy barns or box stalls are not necessary except at foaling time during bad weather. Then it is a good idea to have a clean, well-ventilated, draft-free place for the mare. During good weather, it is best to let them foal out in the pasture or paddock.
The shelter should have 8 feet of headroom, open into a lot or pasture, and be free from protruding nails, loose boards, and other objects that could harm the horse.
Care of Brood Mare
Fillies may be bred when they are 2 years or older and are usually bred in the spring. The pregnancy period lasts approximately 330–340 days, although there is a great deal of variation among mares. March, April, and May are good months for the birth of colts. Consult an experienced horseman when your mare is ready to be bred.
Proper care of the brood mare is essential if she is to produce a strong, healthy foal. Give her regular exercise right up to the time of foaling, and have an experienced person on hand to help when she foals.
If your mare foals in the spring, she can foal on pasture. But if she foals in cold weather, provide a roomy box stall that has been cleaned, disinfected, and freshly bedded. Immediately after birth, treat the foal’s navel with a mild antiseptic to guard against navel infection.
Symptoms of approaching foaling include enlargement of the udder during the eleventh month, relaxing of the croup muscles, and restlessness. Formation of beads of wax on the teats is a good indication that foaling will take place within 1 or 2 days.
In most cases, a mare will foal lying down, and a normal foaling will be over in a few minutes. She will usually pass the afterbirth 3–4 hours after foaling. If your mare does not “clean,” call a veterinarian.
Winter is the time to treat your mare for round worms, bots, blood worms, and other internal parasites. Don’t try to do the job without the supervision of an experienced horseman. It is safest to have your mare treated by a veterinarian.
Care of Feet and Legs
A horse’s feet and legs are extremely important and should be given special attention. If your horse’s feet and legs are dirty, they reflect badly on you. Keep the skin of the legs clean and free from dirt with daily brushing. Clean the hocks, pasterns, and fetlocks carefully.
The old adage “no foot, no horse” emphasizes the importance of a horse’s feet. Before you can care for your horse’s feet properly, you must know the structure of the hoof. The outside of the hoof has three main parts: the horny wall, the horny sole, and the frog.
The horny sole grows out from the live, fleshy sole and forms the bottom of the foot. The horny wall and sole are tough, protective surfaces that safeguard the sensitive inner tissue with its complex series of blood vessels and nerves.
The frog is a semisoft, elastic, triangular structure that grows on the sole between the bars. The frog acts as a cushion, absorbing shock when the foot strikes the ground.
Inspect your horse’s feet every day. Clean all mud and manure from around the bars and frog. Carefully rasp the bottom wall until the hoofs are level and your horse is standing correctly.
Parts of the Hoof
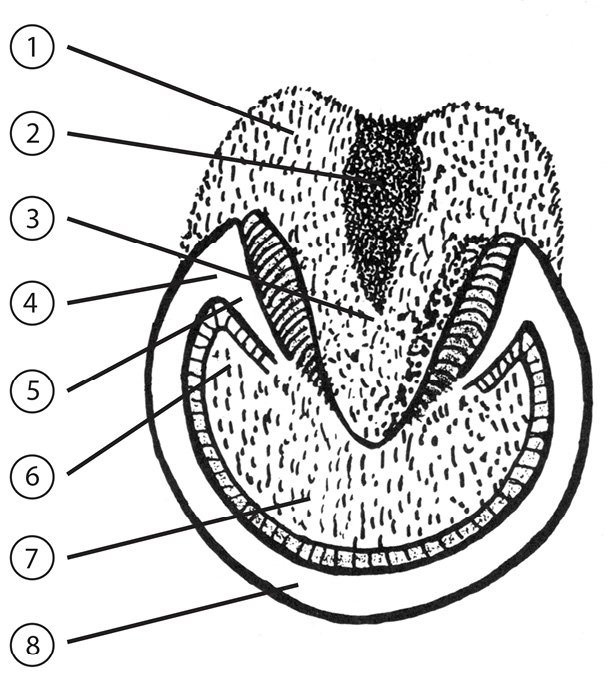
- Bulb of the heel
- Cleft of the frog
- Frog
- Buttress
- Bar
- Branch of the sole
- Sole
- Wall
Cleaning the Hoof
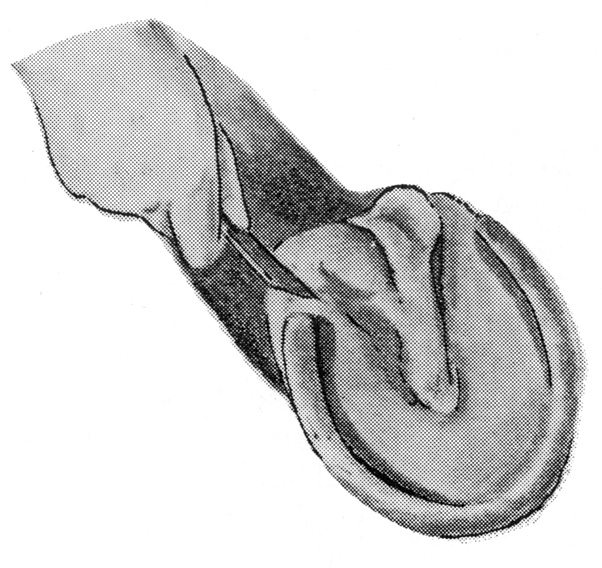
Front Foot
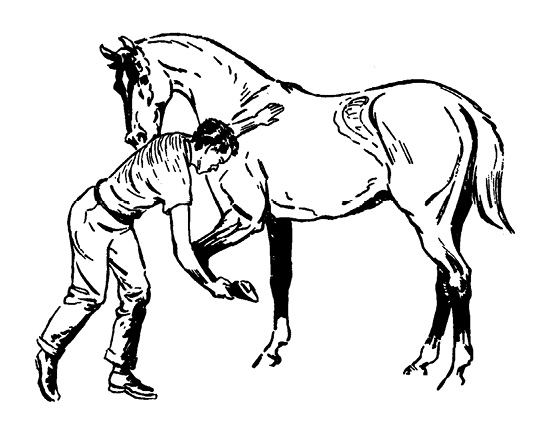
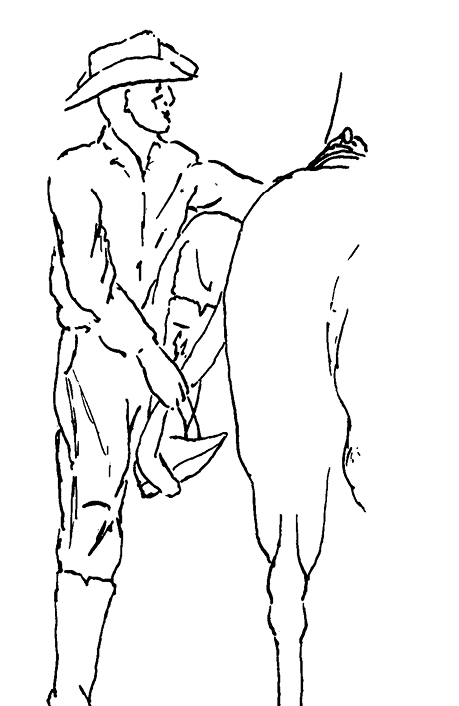
Stand on the left side of your horse, facing its rear. Place your left hand on the horse’s shoulder. Bending over, run your right hand gently but firmly down the back of the leg until the hand is just above the fetlock. Press against the horse’s shoulder with your left hand, forcing its weight onto the opposite foreleg. Grasp the fetlock with your fingers.
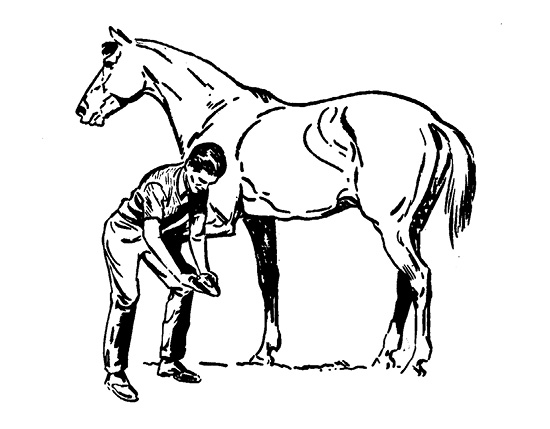
When the horse picks up its foot, place it between your legs, and support it on your left knee.
Hind Foot
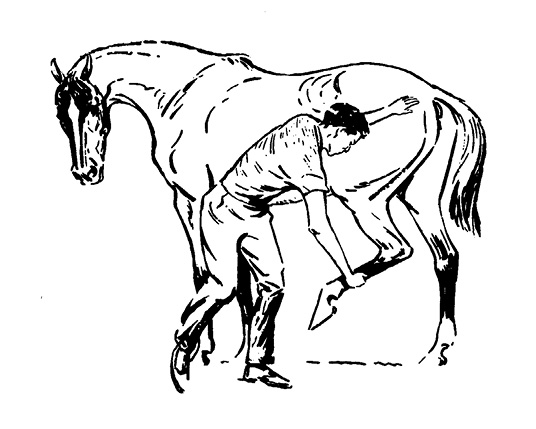
Work from the left side. Stand well forward of the hind quarters, facing the horse’s rear. Gently stroke back as far as the point of the hip with your left hand. Stroke the leg gently but firmly with your right hand down as far as the middle of the cannon. Press against the horse’s hip, forcing its weight onto the opposite hind leg. Grasp the cannon just above the fetlock with your right hand, lifting the foot directly toward you so the leg is bent at the hock.
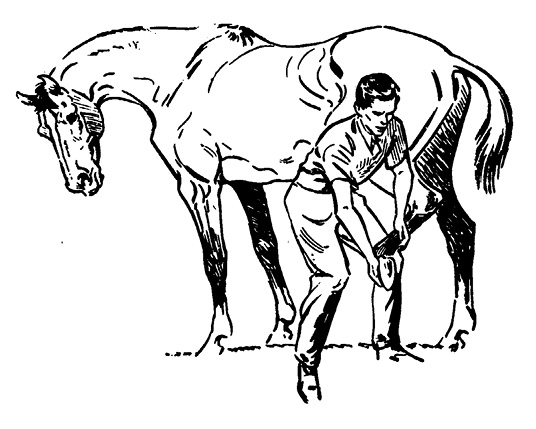
Move to the rear, keeping the hind leg next to your thigh. Avoid holding the foot out to one side; the discomfort of this position will make the horse resist. Swing your left leg underneath the fetlock to support the leg firmly.
Grooming
Grooming cleans your horse and improves its health. The horse will look better, eat better, and feel better, and as a result, it will perform better. A daily, thorough brushing stimulates blood circulation in the skin and helps keep your horse in good condition. While you are grooming your horse, you can check thoroughly for diseases or parasites.
Use only grooming equipment that will not irritate the horse’s tender skin. This equipment includes a soft brush, rubber curry comb, and clean cloth. The steel curry comb should be used only to clean off mud or thick, loose hair and to clean out the brush. Don’t use a steel curry comb on your horse’s legs. You can use a rubber curry comb on the legs, but be gentle.
Here’s a good procedure to follow when grooming:
- Tie your horse securely.
- Check and clean the feet. This will give you an opportunity to check for nails, loose shoes, or signs of infection.
- Start currying your horse with the rubber curry comb on the left side just behind the head. Move in a circular motion from front to rear. Groom the right side the same way.
- Next, brush vigorously with a soft brush. Follow the same procedure as for currying. Clean the brush every few strokes.
- Brush the face and head last.
- A stiffer brush may be used to brush the tail and mane, but use it sparingly. Free tangles with your fingers or a comb; separate a few hairs at a time. It helps to have the tail and mane slightly damp.
- Finally, use a clean cloth to remove any dust or loose particles and to put a high gloss to the hair coat. Occasionally, dampen the hair with a sponge or handful of clean straw. Then brush or rub again with a cloth.
- Use soap and water sparingly. It dissolves the protective oil of the hair and skin.
- Clean the eyes, ears, nostrils, lips, and sheath with a clean cloth.
- If your horse perspires heavily while being worked, scrape the perspiration from its body and rub for a few minutes to remove most of the dampness. Then walk the horse until it stops breathing heavily.
When rubbing your horse, stand at least an arm’s length away and lean slightly forward. Don’t rub too hard. Remember: your horse feels pain, too.
Horse Health
Keeping your horse healthy is an important part of your project. First of all, remember that the veterinarian is a valuable friend when you have disease or parasite problems. Give them a chance to prevent serious trouble when your horse first shows signs of illness. Here are a few things you should know about keeping your horse in good health:
Colic. Pain in the stomach or bowel. Can be caused by bloat, impaction, hernia, or parasites. The horse may become wild—striking, kicking, and rolling—and if it doesn’t get help quickly, it may die. Colic can usually be prevented by avoiding coarse and moldy feed, changing feed gradually, and not feeding or watering the horse too much when it is tired, hot, or hungry.
Founder. Sometimes called laminitis, founder is an inflammation on the foot just under the hard wall. The horse suffers great pain in the affected foot, sometimes standing with its foot held out in front. Founder often occurs when the horse overeats grain or drinks while hot. It sometimes occurs after foaling. While waiting for the veterinarian, stand the horse in cold water.
Lice. A horse with lice will itch severely and rub against objects. Lice avoid daylight but may be found on darker portions of the horse’s body. Spray with recommended insecticide.
Internal parasites. These can be as much a problem to the horse as to other types of livestock. The types most common in horses are bots, red or blood worms, round worms, and pin worms.
Bots are in the stomach. The bot fly deposits its eggs on the horse’s hair, and larvae enter its mouth and attach themselves to the stomach wall. Symptoms include unthriftiness, weakness, loss of appetite, and paleness of the eye. Horses with bots are generally hard keepers.
Red or blood worms are extremely small. They spend part of their life cycle in the intestine and part in the blood stream. Often, they partially stop the f1ow of blood through the arteries, causing colic.
Round worms are 6–8 inches long and live in the intestines. They may sometimes be seen in the manure.
Pin worms are small worms that can be seen around the anus and on the tail.
Combined treatments for internal parasites may be used; contact your veterinarian. Treat colts following weaning or in early fall. All horses should be treated 30 days after the first killing frost. They may be treated again in early spring. Follow this program every year.
Always consult a competent veterinarian when your horse develops unusual behavior or indicates any other ailment.
How to Tell a Horse’s Age

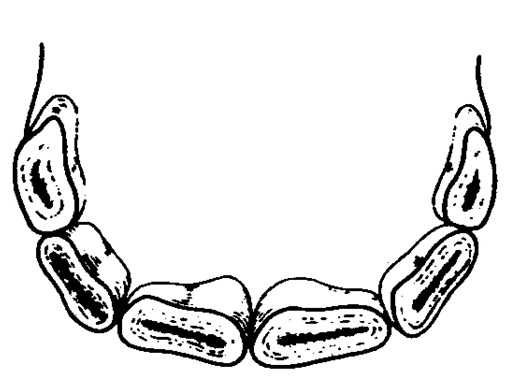
Have a veterinarian or experienced horseman check the age of any horse you are considering buying. A horse’s age is indicated by its incisor teeth. A horse has three pairs of incisors on both the upper and lower jaws. The first pair appear about 8 days after birth, the temporary lateral incisors at 8 weeks, and the third or corner pair at about 8 months.
At 2½ years, the middle pair of incisors are replaced by a permanent pair. These are larger, longer, more rectangular, and less white than the baby incisors, and are grooved with obvious lines. The lateral incisors are replaced by a permanent pair at 3½ years, and the corner permanent incisors appear at about 4½ years.
When the horse is 5–8 years old, the top surfaces of the front incisors become worn, a black cup appears in the center of each tooth, and the edges around the outside of the tooth are a little higher than the black centers. As the horse grows older, the cup becomes rounder and smaller. Finally, as wear on the surface of the teeth wears down the outer edge, the cup disappears.
The cups in the center incisors have almost disappeared at 6 years, the cups in the lateral incisors at 7 years, and the cups in the corner incisors at 8 years. At this time, horses are called “smooth mouths.” When a horse is 9 or 10 years old, the incisor teeth become longer, and a groove appears on the corner incisors.
Handling Your Horse
Safety Precautions
Always observe safety precautions when handling horses. The horse is a timid animal and reacts violently when frightened. But there is no need to be afraid of horses if you follow these common-sense safety precautions:
- Always warn your horse when you walk up behind it. A horse is usually on the defensive. If it suddenly becomes aware of someone behind it, its instinct is either to kick or run. Speak to the horse gently as you approach.
- Work around your horse from a position as near the shoulder as possible.
- Always work close to your horse.
- Always let your horse know what you are going to do. Never move hurriedly.
- Avoid excessive noises or shouting.
- Treat your horse gently and kindly. Abuse can cause horses to become vicious.
Training Foals and Yearlings
It is much easier to train a foal than a mature horse, but training a foal properly requires a great deal of care and patience. Don’t attempt it until you can control your own temper.
A foal’s early training has a great influence on its value and usefulness. Any failure on your part, no matter how slight, may have a lasting effect on your foal. If you fail to catch the horse, it will be more difficult to catch next time. If it breaks a tie rope once, it will try to break it again.
To train your foal properly, make sure that you have no outside disturbances. It is best to put the horse in a pen by itself so that its attention is on the lessons. There are three basic rules to follow:
- Teach your foal one thing at a time.
- Don’t ask the foal to do anything new until you are sure it has learned the previous lesson. Never stop until the horse has done what you want. Force may be necessary in some cases, but it should be gentle force.
- When you have made your foal do something new, repeat the lesson until it is firmly fixed in its mind.
The easiest way to teach a foal to have confidence in you is to always move slowly and quietly when you are near it. Animals are curious. In most cases, a foal will come to you of its own accord, touching you with its nose. When this happens, scratch the foal on the neck and over the withers and hips. Then your foal will want to come to you for you to scratch it again.
You are now ready to catch your foal properly. Be sure to work quietly and slowly. If you have an older, gentle horse, crowd the foal into a corner with the older horse and quietly slip a halter on the foal. Be certain that the lead strap is strong and that you have a firm grip. After the foal quits struggling, tie it where it won’t be able to hurt itself or others. Let the foal stand for an hour or so. Be sure to pet and talk to it during this lesson. A handful of oats and kindness can do wonders in gentling a foal.
Leading
A foal should be gentled and taught to lead when only a few months old. A hackamore is usually used in starting the training of a young horse. A little feed such as oats or some sweet feed before and during the first lessons helps to gentle the horse and teach it that you will not harm it. Brush or wipe the foal often; but never use a curry comb or stiff brush.
After you get the hackamore on your foal, pull it quietly first to one side and then the other. As the foal responds, reward it with patting and rubbing or a little sweet feed.
Many trainers use a non-slip loop that is slipped over the hind quarters to make the foal lead promptly. The important thing is to work with the horse gently for about 30 minutes each day for several days in a row.
Yielding Feet
Next, you should teach your foal to yield its feet, using the method described on page 14. Repeat the lesson until the foal yields its feet willingly. Always pet and handle the foal gently.
Bitting and Bridling
It’s now time to get your horse used to the bit on the bridle. A foal’s mouth is very soft and tender, and a bit irritates it. Be very careful not to give your foal a “hard” mouth through severe use of the bit. A good mouth is one that is responsive to the lightest touch, but never tender or sore.
It is usually best to use a light steel bit with chains and soft, light reins. The weight of the chains keeps a little steady pressure on the foal’s mouth. This light pressure helps develop a light mouth. Be sure that the foal is used to the bit before you use it to control your foal.
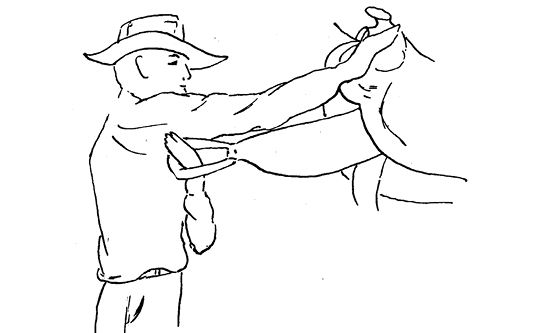
When putting the bridle on, hold it in your left hand and slip the reins over the horse’s neck with your right hand. Transfer the crown piece of the bridle to your right hand. To press open your horse’s mouth, gently insert your left thumb behind its teeth. Then, immediately bring up the bridle with your right hand, drawing the bit into the horse’s mouth. Next, pull the horse’s ears through the crown piece. Handle the ears gently. Buckle the throat latch.
Common Bits
A bit is placed in a horse’s mouth to control it and to let it know what gait you desire. Bits are classified as snaffle or curb, with many special modifications. The curb bit is sometimes called a grazing bit.
The snaffle bit may be a plain, straight bar or a jointed mouthpiece. The jointed snaffle exerts more pressure on the horse’s mouth than a plain snaffle. A single snaffle bit is commonly used for race horses, cow ponies, and many pleasure mounts.
The curb bit has either a plain bar or raised mouthpiece with a check lever or shank at each end of the mouthpiece. A chain or strap that goes beneath the horse’s lower jaw is usually fitted to each shank of a curb bit.
A double-bit bridle is almost universally used in the show ring for gaited horses. The top rein attached to the snaffle, acting on the corners of the mouth, helps to raise the horse’s head. The bottom rein attached to the curb brings the horse’s nose in when beginning certain gaits.
Saddling
Before using the saddle, work on getting your horse over its fear of movements or activities around it. Tie the horse up and rub it with a soft sack. Flip the sack over its body and about its legs.
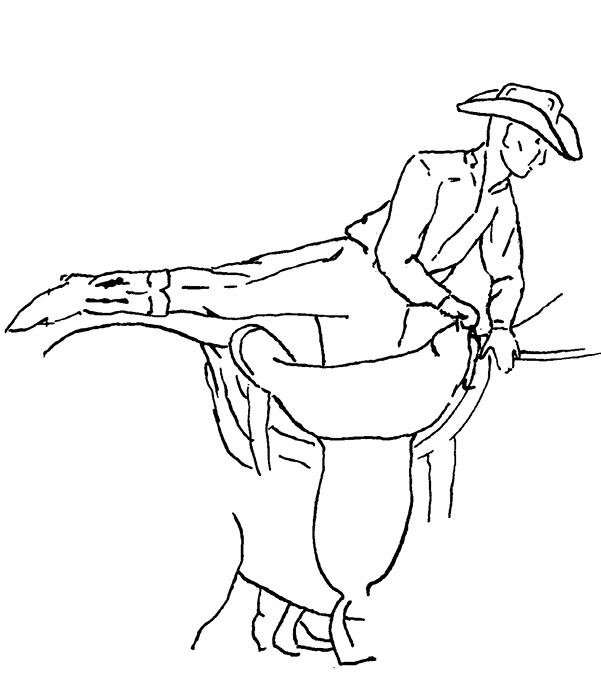
As a 2-year-old, your horse is ready to be taught the feel of the saddle and of your weight. Be sure that the horse is tied securely or that someone is holding it. Then get on its back without a saddle for a few seconds and slide off. After you have done this several times, get on its back and have someone lead it around. When the horse becomes used to your weight, it’s time to put the saddle on.
First, slide the blanket on and off several times until your horse becomes accustomed to it. Then slip the saddle on and tighten the girth strap moderately tight. Be sure that all the hair under the blanket is straight; if it isn’t, the horse may develop a saddle sore.
A 2-year-old may resent having pressure on its back and behind its front legs, so don’t tighten the saddle too tight. Lead your foal around at a walk until it becomes used to the weight of the saddle. Now, gradually tighten the girth strap and continue leading the horse. After it is used to the saddle at a walk, urge the horse into a trot so that it will get used to the squeak of leather and the flap of the stirrups. Saddle and unsaddle the horse several times to make sure that it has learned the lesson well.
Shying
A horse is naturally timid and easily startled. But it is also a creature of habit and can be taught to get used to many things.
As soon as your foal has learned its first lesson well, you should introduce it to as many common objects as you can find. Walk the foal back and forth in front of the object, but not so close to it that it will bolt. As the foal gets used to the object, come closer and closer to it, finally making it stand and look at it until the foal loses interest. Your goal is to get your foal over its fear as well as teach it to go wherever you want.
Equipment
Your equipment is as much a part of your horse project as your horse. Knowing how to care for it and use it properly is important. Learn to identify the parts of your saddle and bridle. Learn how to halter, tie, saddle, and bridle your horse properly.
Western Hackamore
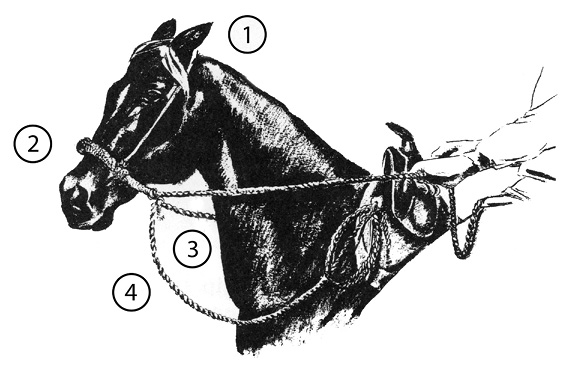
- Headstall
- Noseband
- Reins
- Tie or lead rope
Single-Reined Bridle with Snaffle Bit
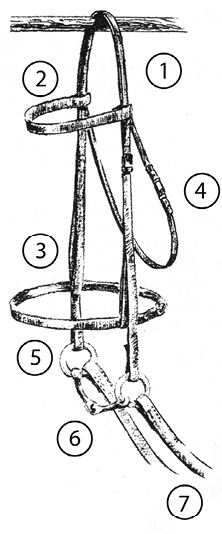
- Crown-piece or headstall
- Browband
- Cheek pieces
- Throat latch
- Noseband
- Snaffle bit
- Reins
Split Ear with
Curb Bit
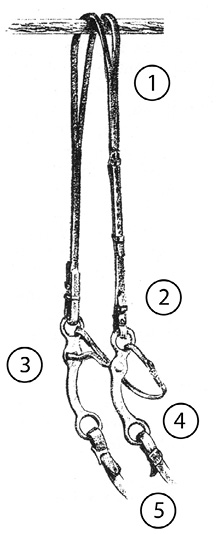
- Crown-piece or headstall
- Cheek pieces
- Curb bit
- Curb strap
- Reins
Western Stock Saddle
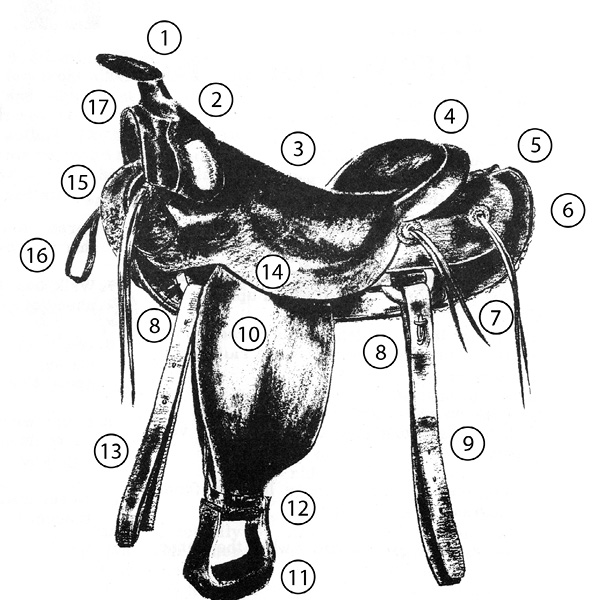
- Horn
- Fork
- Seat
- Cantle
- Skirt
- Back housing or back jockey
- Lace strings
- Dee rings
- Leather flank girth
- Fender
- Stirrup
- Stirrup leather
- Front tie strap or cinch strap
- Front jockey and seat jockey, one piece
- Wool lining
- Rope strap
- Pommel
Care of equipment. At home, always hang your saddle and bridle on suitable racks in a dry room. Mice like leather, so look out!
Leather should be cleaned after use. To keep leather in good condition, first remove the dirt with water and castile soap. Follow with saddle soap on an almost dry sponge to put some of the oils back into the leather and keep it pliable. The most common mistake is to use a sponge that is too wet and not enough soap. The sponge should be so dry that there is no lathering. When leather is extremely dirty, it helps to add a small amount of Sal Soda to the water used for cleaning.
Polish all metal parts with a suitable metal or silver polish. Be sure to rub all polish off the bits before they are used. Keep saddle and stable blankets clean, dry, and well aired. Occasional washing is necessary.
Show equipment. If you are going to shows or fairs, you need a water bucket (at least 16 quarts), a feed pan or feed box for feeding grain, a second bucket for washing your horse and equipment, a box for your grooming equipment, and preferably a tack box or trunk for your saddle, bridles, and other equipment. Well-kept equipment is the mark of a good horseman. Take care of yours so that you can take pride in it always.
Riding Your Horse
Keep the following points in mind.
- Start slowly when leaving the barn to allow your horse time to warm up.
- Keep at least one length of a horse (about 10 feet) between horses when riding in a line.
- Ride on the right side of the road. A horse is considered the same as a vehicle.
- Tie horses two or more lengths from each other.
- Loosen the girth slightly when the horse is resting.
- Never run your horse past another horse that is being ridden at a walk. The other horse may jump or break into a run, throwing its rider.
- Walk beside the horse when leading, not ahead of or behind it.
- Don’t try to outpull your horse. It is stronger than you and will usually respond to a quick snap of the lead strap.
- Never wrap the lead strap, halter shank, or reins around your wrist or hand. You could be dragged.
- Never mount your horse in a barn or near fences, trees, or overhanging projections.
- Adjust the saddle carefully and cinch tight enough so that it will not turn when mounting.
- If your horse is frightened by an obstacle, dismount and lead the horse by it.
- Hold your horse to a walk when riding up or down hills.
- Walk your horse the last mile or half-mile to cool it off.
- In cold weather, if your horse is heated, put a blanket on it and walk until the horse has cooled.
- Don’t water your horse until it has cooled.
- Don’t feed grain or green grass to your horse when it is heated. You can feed hay to a heated horse.
- Safe riding also depends on keeping your bridle reins, stirrup leathers, and cinch straps in the best possible condition.
Gaits
A gait is a manner of walking, running, or moving. The three natural gaits of any horse except the Tennessee Walking Horse are the walk, the trot, and the canter. The natural gaits of the Tennessee Walker are the walk, the running walk, and the canter. Two other gaits—the slow gait and the rack—are not natural and must be learned.
Walk

A four-beat gait with the feet striking the ground in the following order: right front, left rear, left front, right rear. The feet should be lifted from the ground and placed down flat-footed.
Trot
A two-beat gait with the left front and right rear feet and right front and left rear feet striking the ground together. The horse’s body remains in perfect balance. The trot should be balanced and springy.
Canter
A three-beat gait that should be slow. The canter is actually a restrained gallop where the horse may lead with either of its front feet. The lead foot will be the first to leave and the last to strike the ground. When a horse leads with its left foot, the feet will strike the ground in the following order: right rear, left rear and right front, left front.
Pace (stepping pace modified)
Fast, two-beat gait with the lateral fore and hind feet hitting the ground simultaneously. It is faster than a trot but slower than a run or gallop. The pace is a popular gait in England. This pace is objectionable in soft underfooting. It allows for quick bursts of speed. It is a speed gait rather than a road gait.
Slow gait. An artificial four-beat gait of the five-gaited horse. It is a smooth-riding gait but very tiresome to the horse. Each foot is moving more or less separately in this order: left rear, left front, right rear, right front.
Rack. The only difference between the slow gait and the rack is speed; the rack is faster.
Running walk. The natural gait of the Tennessee Walking Horse. It is a very smooth gait with a gliding rhythm that is quite pleasant for the rider. The horse will average about 7 miles per hour in this gait, and its head will have a definite up-and-down movement. This is a four-beat gait, with the feet striking the ground in the following order: left front, right rear, right front, left rear.
Principles of Horsemanship
Horsemanship is getting the horse to do just what the rider wishes at all times with the least amount of effort for both the rider and the horse. Horses are managed by the reins, legs, and weight. These are often called the aids.
The fundamental principles of horsemanship are a good seat and good hands. Good hands are perhaps the most important, since they are your means of control and communication. But since you can’t have good hands without first having a firm, comfortable, steady seat, the basic requirement for riding properly is a good seat.
Now, if you have learned to handle your horse well, you are ready to ride. The foal is a youngster and tires easily, so several short lessons are much better than one long one. Be patient and gentle at all times.
Accustom the foal to your weight in the saddle as you did before the saddle was put on.
Before mounting, take two precautions: always check the cinch for tightness and the stirrup straps or leather for length. A loose cinch may let the saddle slip down on the horse’s side or belly, especially during mounting or dismounting. If the cinch is properly adjusted, you will have to use force to get more than the first half of your fingers under it.
Saddling the Mount
Place the saddle on the horse’s back so the girth comes about 4 inches to the rear of the point of the horse’s elbow. When first adjusted, the girth should be loose enough to allow a finger between it and the horse’s belly.
After tightening the saddle, it is always good to “untrack” the horse by leading it ahead several paces before mounting. This untracking does two things. First, if your horse is the kind that blows up so that it cannot be cinched snugly, the untracking will usually cause it to relax. Second, if a horse has any bad habits, it will often get them out of its system before the rider mounts.
After you ride the horse a few minutes, always reexamine and tighten the girth if needed. Cinch the saddle tightly enough that it will not turn when mounting, but not so tightly that it causes discomfort to the horse.
The length of stirrups depends on the type of riding. The length may be readjusted after riding a few minutes.
The stirrup should just reach into your right armpit. Adjust accordingly. Reverse the arm arrangement when adjusting right or off stirrup.
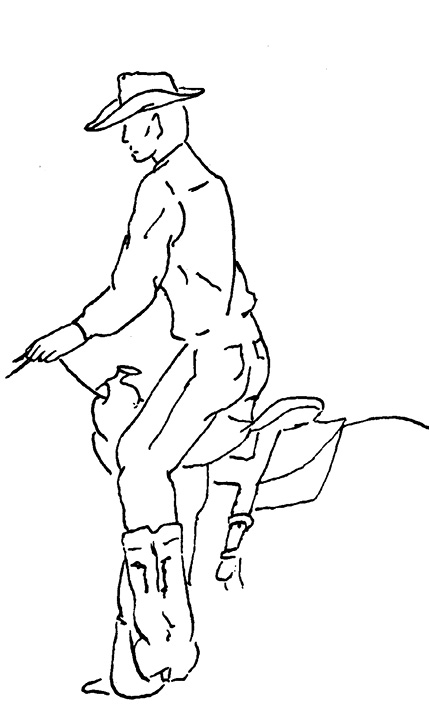
Mounting
- Always mount from the left side of the horse. Stand beside the horse’s left front legs and face toward the rear. This is safer than mounting while facing the front of the horse because you will automatically swing into the saddle if the horse starts to move.
- Gather the reins in your left hand. Adjust them to apply a gentle pressure equally on each side of the horse’s mouth to restrain but not back the horse. Place your left hand on or just in front of the horse’s withers.
- Hold the stirrup with your right hand and shove your left foot into it. Then, immediately place your right hand on the cantle at the rear of the saddle. In western riding, put your right hand on the saddle horn instead of the cantle.
- Keep close to the horse for good leverage and spring up from your right foot. Pause momentarily when you reach a standing position. Your left leg should be straight.
- Swing your fully extended right leg slowly over the horse’s croup, being careful not to kick it.
- Come slowly and easily to rest in the saddle. Avoid punishing or frightening the horse by suddenly dropping the entire weight of your body into the saddle.
- Without looking, shove your right foot into the right stirrup and properly adjust both stirrups under the balls of your feet. At the same time, gather the reins in one or both hands. If you hold the reins with your left hand, toss the ends of the reins (the bight) to the right side of the horse’s neck. In English riding, drop your right hand loosely to the side or put it on your left wrist; in western riding, place your right hand on your thigh. Never put it on the pommel of the saddle.
- Sit easily in the saddle, with your legs hanging comfortably, heels well down and toes turned out slightly. This position allows proper leg contact with the horse and a more secure seat.


Dismounting
Correct dismounting is just the reverse of mounting. First, carefully gather the reins in your left hand, which is placed on the pommel or in front of the withers. Kick your right foot free from the stirrup. Transfer your weight to your left foot as you swing your right leg backward across the horse’s croup. Grasp the cantle (or the horn in western riding) with your right hand, descend to the ground, and remove your left foot from the stirrup.
When properly executed, mounting and dismounting are a series of rhythmic movements. The entire operation is so smooth and graceful that it is difficult to tell when one stage ends and the next begins. If you have handled your horse properly it shouldn’t buck.
Be careful! A horse that throws its rider will be more difficult to train from then on. It may be a good idea to have someone lead the foal with you in the saddle. Don’t use the bit at this time; let the horse learn to walk relaxed.
Holding the Reins
You may hold the reins either in your left hand alone or in both hands. In western riding, only one hand, usually the left, holds the reins.
Holding the Reins Western Style
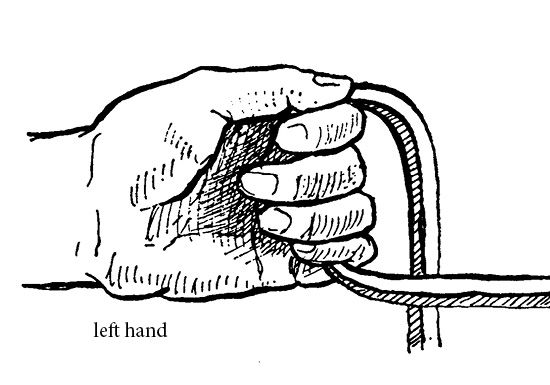
There are other methods of holding the reins western style. If you enter a contest or show, check with the judge for their preference.
Rein pressure should never be more than absolutely necessary. Do not use the reins to stay on the horse. A horse’s mouth is tender, but it can be toughened with unnecessary roughness. Good hands on the reins move in rhythm with the horse’s head. Beginners are likely to let their hands bob too much, which jerks the horse’s mouth unnecessarily. Your goal is “light hands”—when a light feeling extends to the horse’s mouth via the reins.
Riding
The western stock saddle should be ridden with an almost straight leg and long stirrups. The stirrups of the English saddle should be long enough so that with your legs hanging naturally out of the stirrups, the tread of the stirrups will strike just below your ankle bones. Your legs should be against the horse without pressure, your knees down and closed against the saddle. The stirrup straps should be vertical. Your feet should be at least halfway in the stirrups, ankles bent, heels down as far as possible, toes out slightly. If you are seated properly, you shouldn’t see your toes when you look down.
You will have a balanced seat when sitting in the lowest part of the saddle, leaving a space of 4 to 6 inches between your back and the cantle of the saddle. Your body should be slightly forward of the true vertical and balanced on a base consisting of seat, thighs, knees, and stirrups. Your back should be hollow, waist relaxed, head erect, and shoulders square.
Your center of gravity is directly over the horse’s center of gravity, and, as a result, you present the lightest possible load. Once you have learned a good seat, you need a minimum use of aids to get an immediate response from your horse at any gait. A balanced seat, assisted by the flexibility of your waist and back, gives you a secure position from which you can’t easily be dislodged, even by unexpected movements of your horse. Because of the practical work of western stock horses and the speed that is frequently required of them, a strong, firm seat and good balance are especially important.
With western equipment, hold both reins in one hand and ride your horse with a loose rein. Stock horses should be trained to neck rein as described in the section below on neck reining.
Getting your horse’s attention. It is necessary to gather your horse, or get its attention, before it can respond to your commands. You can get its attention either by slightly lifting the reins or closing your legs. If it is standing badly, it must get its legs under it and be ready to go. With practice, you will be able to gather your horse without starting it forward.
Starting and stopping. You can start a horse by leaning forward in the saddle and urging it slightly with your legs. With practice, it will learn to start easily and smoothly with little urging.
To stop your horse, lean backward in the saddle and pull gently on the reins. One good way to teach your horse to stop is to walk it toward the barn, and just before it reaches the barn, pull back on the reins. The horse will stop naturally to keep from running into the barn, but it will soon learn to stop on command. An essential part of this training is to make your horse stand quietly when stopped.
You start the trot in the same way that you start the walk, but you need to use more of a forward urge with your legs and a greater forward shift of your weight.
Backing should always be taught with the rider dismounted. Stand in front of your horse, holding the reins close to the bit. Slowly push the horse backward by placing your hand on its chest and pulling back on the reins at the same time. Once your foal is started backward, it should move from the pressure on its chest alone. The reins should act merely as a signal. Continue backing the horse while dismounted until it backs freely and is no longer nervous or afraid.
Next, you should begin mounted backing. Sit as far back in the saddle as possible and use very little rein. Be satisfied with a few steps at first. Don’t treat your foal roughly; it may become sullen and cause trouble. Once it learns to back mounted, teach it to back and keep backing with pressure from your legs alone.
Neck reining. Stock horses or pleasure horses ridden with western equipment should be taught to neck rein. Use two hands at first, one to pull in the direction you want your horse to turn and the other to bear the rein on the opposite side of the neck. A horse learns best at slow work, so teach it to neck rein at the walk or trot. Once your horse has learned to neck rein, you need only one hand to hold both reins and guide it.
Riding the walk, trot, and canter. When your horse is in motion, your body should be inclined forward to a degree determined by the horse’s speed and gait.
At the walk, your body should be inclined forward slightly more than at the halt, and should have an erect, alert appearance. Keep your horse’s head up with the bridle, and keep the horse swinging along at a brisk, flatfooted walk.
At the trot, you undergo a definite impact that tends to throw you from the saddle. The correct way to ride a trot with English equipment is by posting. Posting can best be described as a rocking motion that is equally comfortable to the horse and rider; you rise gently from the saddle and ease back into it with the two beats of the trot. Use your balance from the stirrups half the time and contact with your knees and thighs the other half. To maintain a secure seat, your knees and thighs must be in contact with the saddle at all times. If your weight is evenly distributed, your legs should not swing as you post. Posting should not be a forced, labored rising from the saddle to stand in the stirrups. You are posting on the right diagonal when you rise from the saddle with the horse’s right shoulder, and on the left diagonal when you rise with the left shoulder. Most stock or pleasure horses with western equipment are not usually ridden at the trot for very long periods. A fast trot with a long stride must be posted as with English equipment. You can “ride out” a slow trot by sitting down flat in the saddle.
When riding at the canter with either English or western equipment, sit as close to the saddle as possible, with your knees and thighs in close contact with the saddle. Your body should be relaxed but erect, and should not be inclined quite as far forward as at the trot. Speed is not essential in the canter. When a horse is cantering properly, it looks active but restrained, hits the ground lightly in front while placing more of its weight in its hindquarters, and moves very little faster than a walk. “Cantering all day in the shade of an old apple tree” is an old saying that expresses the desire for a slow, restrained canter that is easy on both the horse and rider.
Taking the leads. At the canter, a horse will naturally extend one of its forelegs farther forward than the other. This is called the right or left lead, depending upon which leg is farther ahead. By looking over your horse’s shoulder at its forelegs, you can tell which lead it is taking. You should train it to take either lead at your command.
To start the canter at the left lead, shift your weight toward your horse’s right hindquarter while slightly lifting its head with the reins. With your right leg well back, give it a light boot to push its hindquarters to the left, and at the same time urge it into the canter. Your left leg should be slightly forward toward the horse’s left shoulder, twisting you slightly in the saddle. The idea is to start your horse a little toward the left instead of straight ahead and to lighten its left forequarter by shifting your weight to its right hindquarter. (The directions for taking the right lead are exactly opposite.) Always remember that you start the canter with your weight back, not forward as in the walk or trot.
Some horses like to take only one lead. If your horse gets into this habit, practice starting on the opposite lead until it can do it smoothly and easily. It is never easy to teach a horse to start on the opposite lead. One method that may help is to trot your horse into a fence at a 45-degree angle and then break into a gallop just as it comes to the fence. Canter on the unaccustomed lead for several minutes to overcome its awkwardness. Once you break the habit, continue to work it, using both leads. First, start your horse into a canter from the trot, then from the walk, and, finally, from a standstill.
When a horse is ridden in a ring, it should canter on the left lead when circling left and on the right lead when circling right.
Ground tying. Often, you will need to dismount and leave your horse where there is nowhere to tie it up. For this reason, you should teach the horse to stand as if tied to an object when you drop the reins to the ground. This is known as ground tying your horse.
There are several methods for teaching ground tying. One is to place a 50-pound weight in the middle of a large corral or paddock. Stop your foal near the spot, tie one rein to the weight, and drop the other to the ground. When your colt moves, it will discover that it is tied.
Another method is to tie short pieces of wire to boards and bury the boards in various places around the farm, tying your colt to them whenever you want it ground tied. It will soon learn to stand when the reins are down.
Faulty action is any way of moving in which the horse’s stride is not long, straight, and true. Some of the most common faults are:
- Forging: striking the undersurface of a front shoe with the toe of the hind foot
- Interfering: striking the supporting leg with the foot of the opposite striding leg
- Paddling or winging out: throwing the front feet out to the side during the stride
- Pounding: making very heavy contact with the ground at the completion of the stride
- Pointing: extending the foreleg without flexing the knee
Fitting and Showing Your Horse
Preparing for the Show
Your horse should be very clean when you show it. Brush its hair coat until it is shiny and free from dirt or loose dandruff. Trim and clean the walls and soles of the feet. Apply neatsfoot oil to the hooves to make them look neat and clean.
If your horse is extremely dirty or light in color, it may be necessary to wash it. If you need to wash your horse, do it several days before the show; then, keep its hair clean by brushing and putting it in a clean stall. Ordinary laundry bleach is sometimes used to take stains from white hair.
You can use a comb on the mane and tail. Pick out the foreign material and keep the hair separated. When shown under English equipment, the forelock and the first lock of mane should be braided with ribbon. Stock horses usually have their manes clipped, or roached, except for the forelock and a small tuft about 4 inches long at the withers.
Trim the long hairs around the muzzle and chin and the fuzz on the inside and outside of the ears. Often, a l-inch strip behind the ears is clipped for the bridle. Hair on the fetlock may be clipped or pulled to give a neater appearance. Do this work at least 3 weeks before showing.
Several weeks before transporting your colt to the show, practice leading it into and out of a truck or trailer until it no longer becomes excited.
Handle your horse in an area very similar to the show ring. Ask your friends to come by to see your horse to get it used to strangers.
Show Classes
In addition to showing your horse at halter, you may show it under saddle with either English or western equipment. A horse shown under saddle is judged on its conformation and its ability to perform the gaits: walk, trot, and canter. Five-gaited horses, which are usually ridden with English equipment, are also judged on the slow gait and rack.
English equipment consists of a single or double-reined bridle and an English saddle. Stock-horse equipment consists of western saddle, bridle, breast collar, and a rope tied to the saddle. The rider should be dressed neatly in appropriate western dress.
In western classes, the horse is judged on its ability to work a figure eight at a slow canter, changing leads so that the inside foot is always leading. It is then run a short distance, stopped, and backed. There are many variations in classes for stock horses, but all are based on good training.
What to Do When Showing
Be sure that your horse is well groomed before you take it into the show ring. Do not use showy or flashy equipment in halter classes.
Be ready when called. Enter the ring leading your horse with your right hand and walking at its left side, even with its head. Hold the lead strap 18 to 24 inches from the halter. Carry all excess strap coiled up neatly in your right hand.
Always be courteous to the judge and to the public. It is permissible to get in a favorable position in the ring, but remember good manners and sportsmanship. Learn to win and lose graciously.
Rules for Good Horsemanship
- Mount correctly from the left side; make the horse stand still until you are properly seated in the saddle.
- Ride with heels kept down, toes turned out slightly, head and chest lifted, shoulders square, elbows close to the body, and ankles, shoulders, arms, and wrists flexed.
- Avoid such habits as “clacking” to the horse or slapping it with the ends of the reins.
- Warm up the horse slowly; walk it the first half-mile and then jog it slowly for another quarter-mile.
- Hold the horse to a walk when traveling over paved streets or roads.
- Keep to the right side of the road, except when passing, and give the right-of-way courteously.
- Never rush past riders who are proceeding at a slower gait. This startles both horses and riders and frequently causes accidents. Instead, approach slowly and pass cautiously on the left.
- Always keep your horse under control. Galloping a willing horse is poor horsemanship and shows ignorance on the part of the rider.
- Keep the proper tension on the reins; avoid either tight or dangling reins.
- Slow the horse down when making a short turn.
- Do not ride too close to the horse in front of yours to avoid danger from kicking. Either keep abreast or a full horse’s length behind other mounts.
- Walk the horse when going up or down hills.
- Do not force the horse to take a rapid gait for more than a half-mile at a time without allowing a breathing spell.
- Walk the horse when approaching and passing through underpasses and over bridges.
- Bring the horse in cool by riding at a walk the last mile to the stable.
- Never let the horse gorge on water or feed when it is hot.
- Groom your horse thoroughly after each ride.
- Avoid walking behind any horse.
- Wash the bit off thoroughly before hanging it in the tack room. Remove any hair or sweat marks from the saddle and girth before putting them on the rack. Wash all leather equipment frequently with saddle soap.
- Feed the horse a balanced ration and keep it healthy.
Publication 450 (POD-09-23)
Reviewed by Clay Cavinder, PhD, Professor, Animal and Dairy Sciences. Written by Joe Baker, PhD, Extension Animal Science Specialist (retired).

The Mississippi State University Extension Service is working to ensure all web content is accessible to all users. If you need assistance accessing any of our content, please email the webteam or call 662-325-2262.

